(855) 676-0881

Pre-Winter Weatherstripping Guide: Kerf, Bulb, and Foam Types Explained


Published: Nov 5, 2026

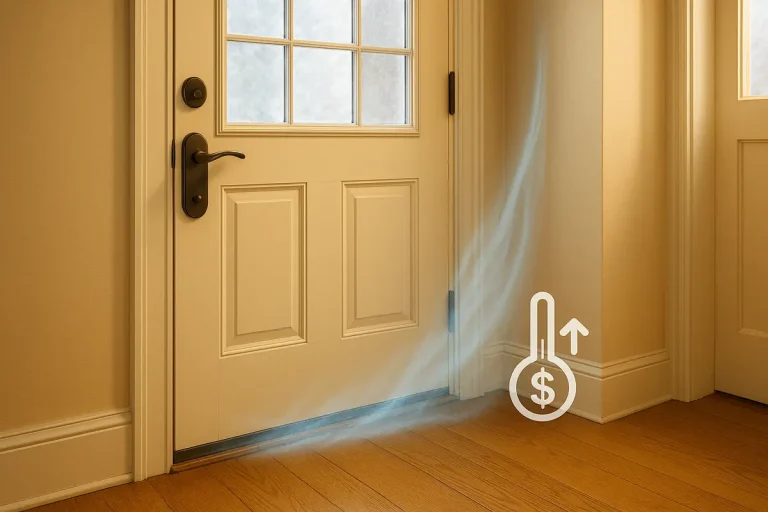
As freezing air approaches, homeowners evaluating winterization strategies quickly realize that a drafty entry threshold isn’t just uncomfortable—it is expensive. According to the U.S. Department of Energy (DOE), unsealed or degraded exterior door perimeters account for 11% to 15% of total home air leakage, equivalent to leaving a four-inch square hole open in your exterior wall all winter long. Upgrading to high-efficiency compression weatherstripping can deliver a 10% to 20% reduction in annual heating bills.

However, the primary failure point in DIY weatherization isn’t buying low-quality products—it is matching the wrong seal mechanism to your frame’s specific geometry or causing door lock binding that keeps deadbolts from throwing smoothly. Evaluating Kerf, Bulb, and Foam weatherstripping properly before freezing weather arrives ensures maximum energy efficiency without compromising door operation.
Quick Diagnostic: What Type of Door Jamb Do You Have?


Before selecting a material, you must identify your frame architecture. If you are asking how can I tell if an exterior door is causing drafts or energy loss?, start with a simple DOE draft audit: shine a bright flashlight around the door perimeter at night while someone stands outside, or trace an incense stick along the frame rebate to pinpoint active draft channels.

Next, inspect the construction of your door frame stop:

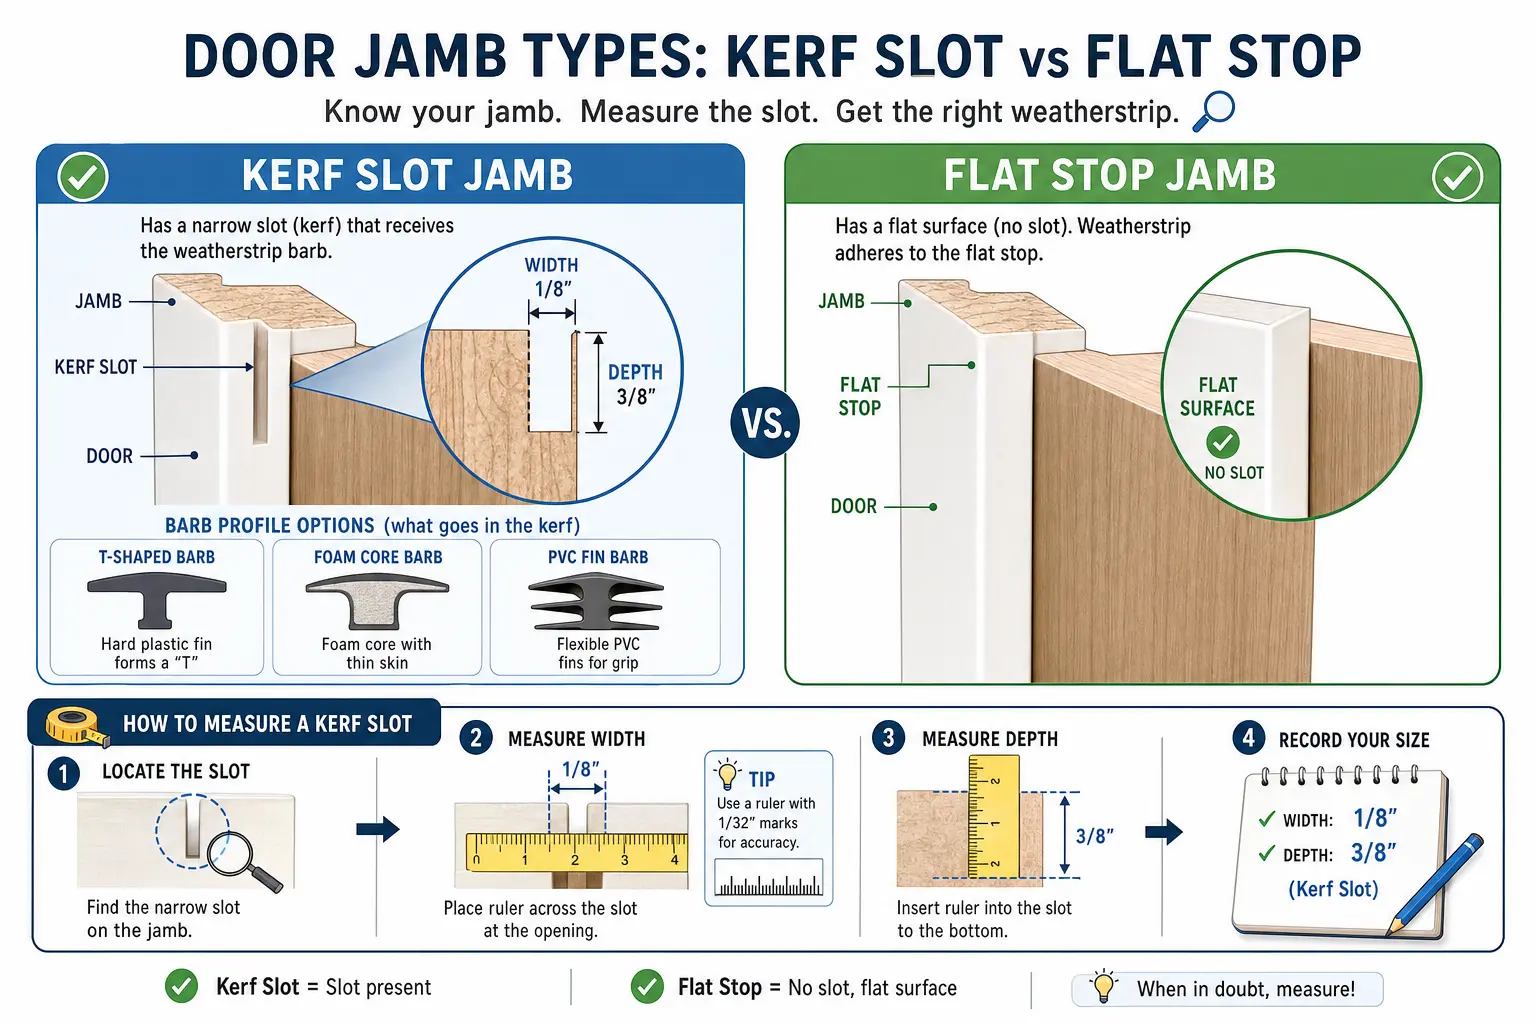
  • Kerfed Door Jambs: Standard on modern exterior doors, these frames feature a pre-milled groove running along the inner stop moulding. Standard dimensions are 1/8″ slot width and 3/8″ slot depth. Kerf weatherstripping features a flexible barbed stem that presses directly into this channel without adhesives.
  • Flat Stop Jambs: Common on historic wood frames, smooth metal jambs, and older homes, flat stops lack a milled channel. These require surface-mounted options, such as self-adhesive tapes, rigid aluminum bar carriers screwed to the frame, or spring-tensioned weatherstripping.

Visual guide to identifying kerf and flat door jambs with precise measurements, foundational for selecting the right weatherstripping and avoiding costly installation errors.

Kerf vs. Bulb vs. Foam: The MOFU Comparison Matrix


Selecting the ideal profile requires balancing gap tolerance, sub-zero resilience, and pet resistance. Selecting proper energy-efficient door solutions comes down to understanding material elasticity under extreme temperature stress.

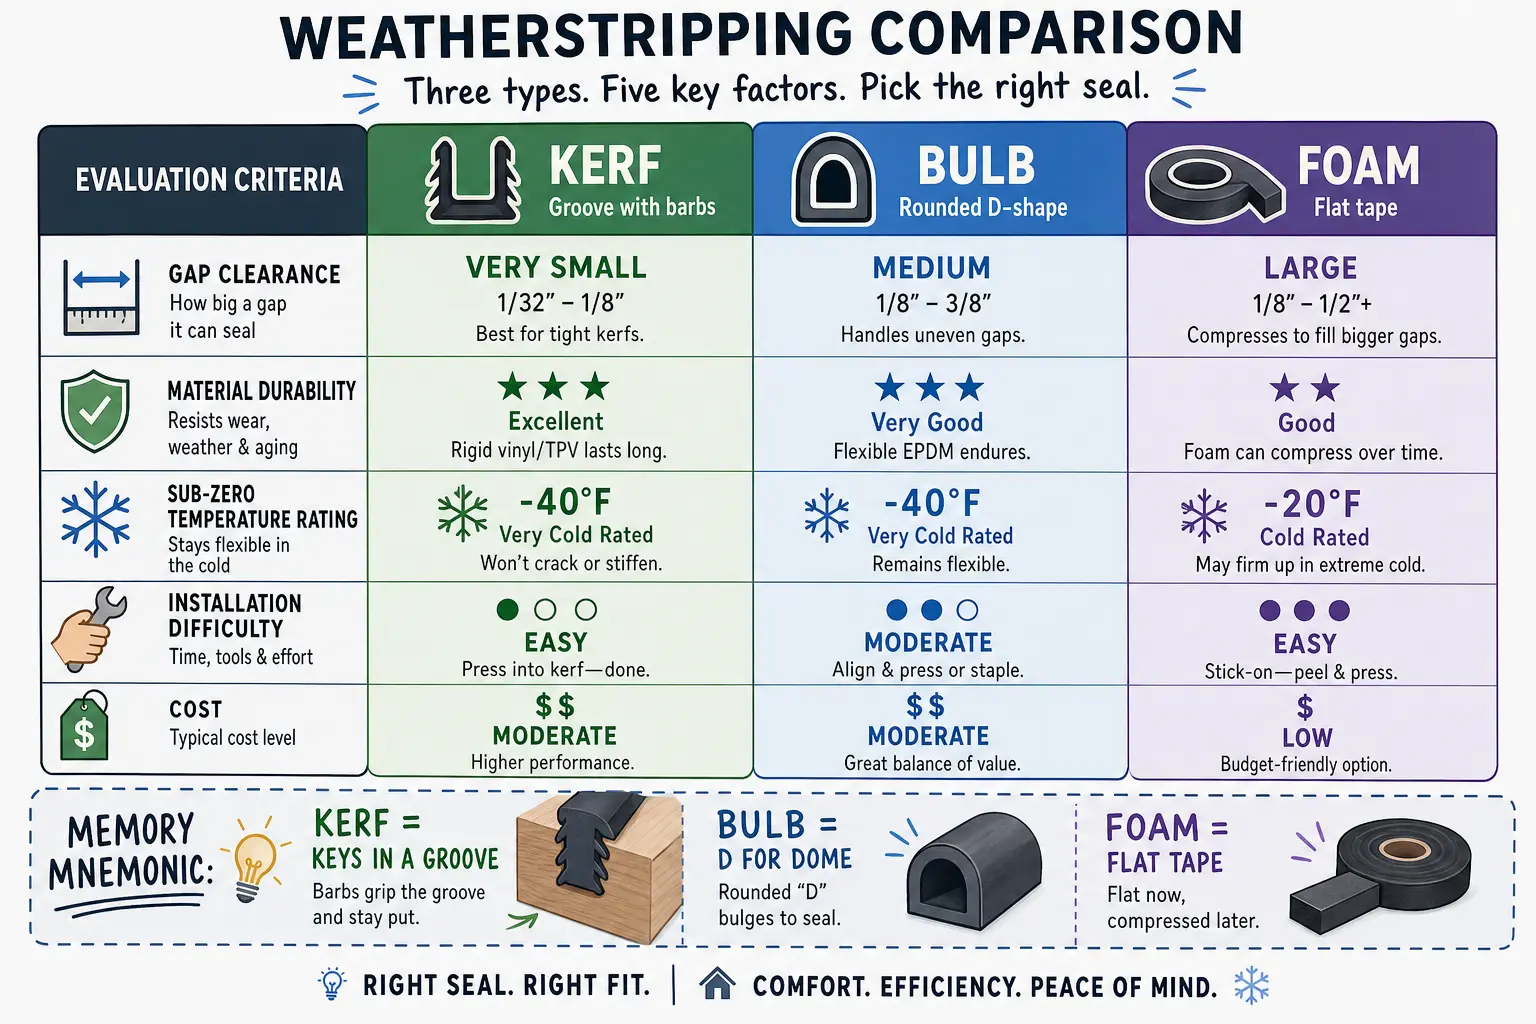
At-a-glance comparison of kerf, bulb, and foam weatherstripping types to help homeowners easily remember differences and choose based on climate, gap size, and durability needs.

1. Kerf Weatherstripping (Best overall for modern frames)

Kerf options usually feature vinyl-wrapped polyurethane (PU) foam or solid EPDM rubber bulbs attached to a push-in plastic barb. While vinyl-coated foam provides clean aesthetics, it carries a 3–5 year lifespan and can tear if pet claws catch it. In contrast, solid EPDM rubber kerf seals retain 95%+ elasticity at -40°F and last over 10 years without hardening.

2. Bulb Weatherstripping (Best for uneven gaps and flat jambs)

D-shaped hollow bulb profiles compress smoothly across variable gap depths, making them ideal for doors that are slightly warped or out of plumb. High-grade EPDM and silicone bulbs create an airtight seal while minimizing closing resistance. They mount via heavy-duty peel-and-stick backing or rigid metal screw-on carriers.

3. Foam Tape Weatherstripping (Short-term budget solution)

Open-cell polyurethane foam tape suffers from severe “compression set”—permanently flattening after a single cold season and losing over 60% of its height. Closed-cell EPDM foam tape offers far better moisture and temperature resistance, though pressure-sensitive adhesives can peel under deep sub-zero conditions.

Stopping Latch Binding and Corner Drafts


A common issue when installing thick weatherstripping is door latch displacement. When a replacement seal is too thick or rigid, the latch bolt fails to drop cleanly into the strike plate, or a storm door won’t close without excessive force.

To preserve smooth operation while maintaining a tight seal:

  1. Check Frame Plumb: Tighten loose top hinge screws to draw a sagging door leaf back into alignment before sizing new perimeter weatherstripping.
  2. Adjust the Strike Plate: Shift the strike plate slightly or file the latch opening to accommodate the compression depth of new rubber bulb seals.
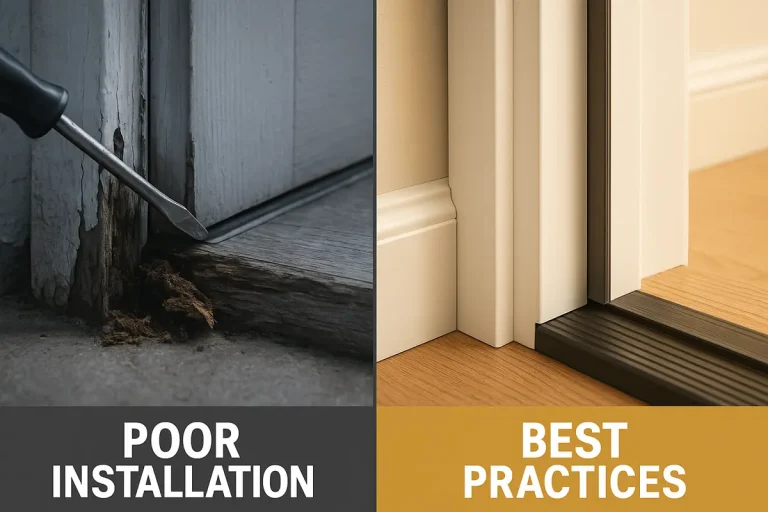
  3. Install Corner Dust Wedges: Cold air frequently bypasses perimeter strips at the bottom jamb junctions. Self-adhesive foam corner pads placed at the threshold corners seal these critical gaps. If your frame structure is damaged or severely rotted, a professional door jamb replacement ensures proper structural support before sealing.

Step-by-Step Installation Protocol (Zero-Leak Guarantee)


Proper preparation and execution guarantee long-lasting thermal protection:

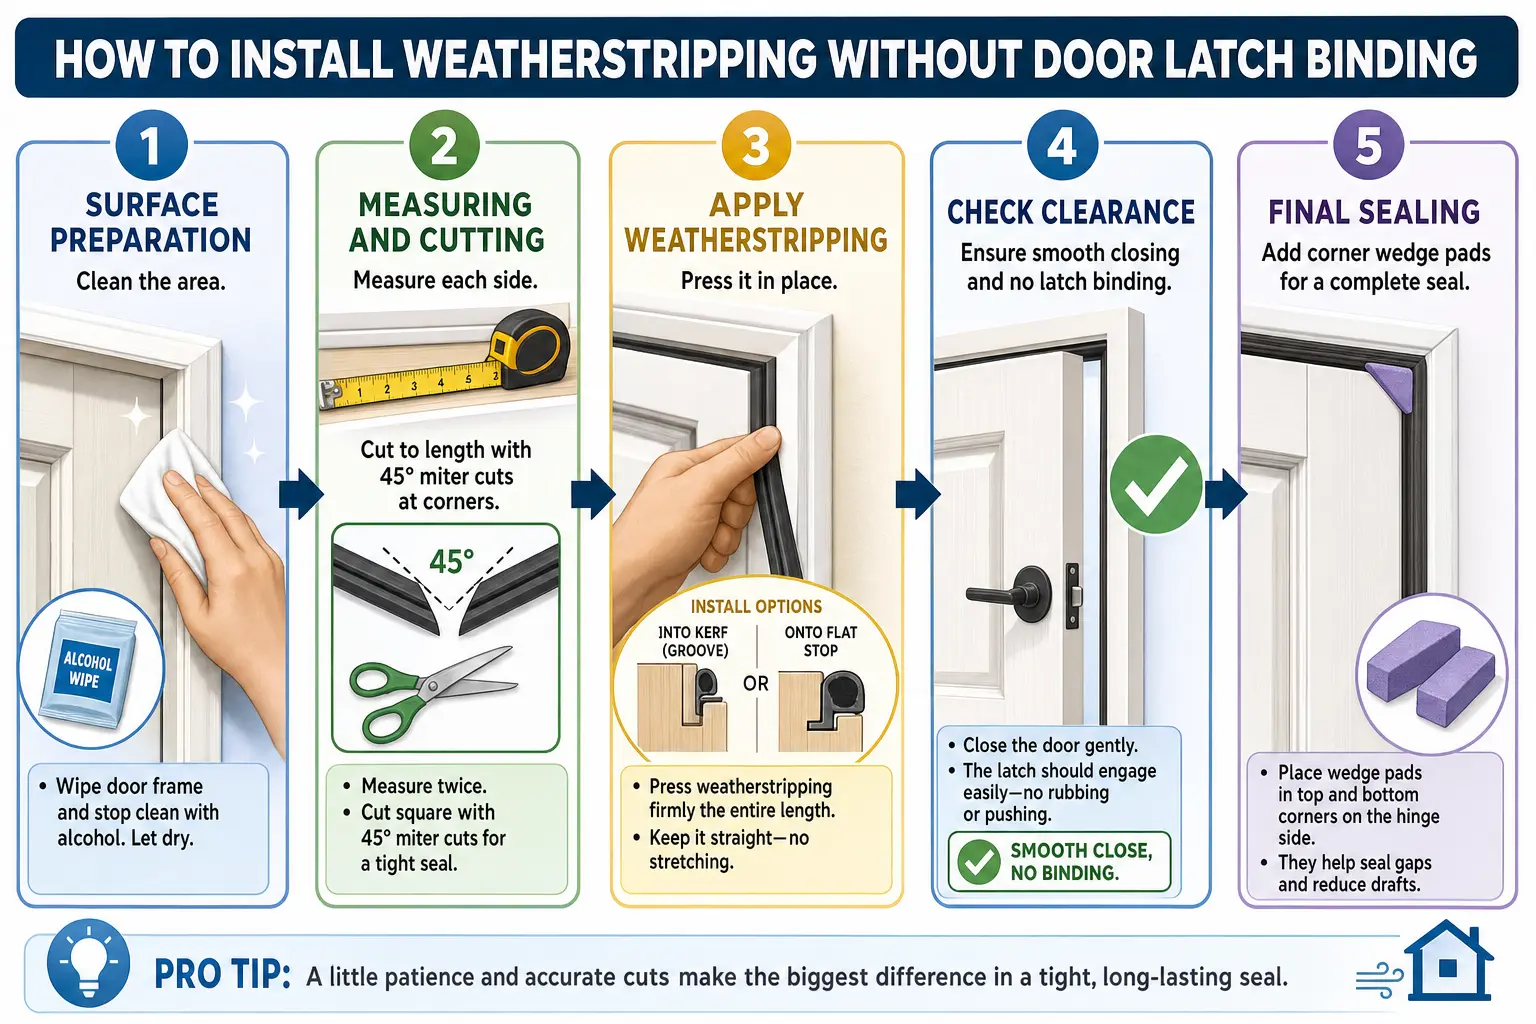
  1. Prep the Surface: Pull out worn seals. Use a putty knife and isopropyl alcohol to clear debris out of the 1/8″ kerf slot or remove old adhesive tape from flat stop faces.
  2. Measure and Cut Miters: Measure header and side jambs precisely. Cut top corners at matching 45-degree miter angles for a tight perimeter fit, avoiding simple square butt joints that leave air gaps.
  3. Press or Mount Without Stretching: Firmly seat kerf barbs into the slot using a spline tool or thumb pressure. Avoid stretching rubber or foam during installation, as tension causes seals to shrink back and pull away from corners over time.

Stepwise DIY weatherstripping installation protocol ensuring a tight, draft-free seal without interfering with door latch operation or locking mechanism.

If you encounter persistent latching issues, frame gaps, or damaged jamb structures, scheduling expert front door repair maintenance will ensure your home stays warm, energy-efficient, and secure all winter long.

Frequently Asked Questions


Why won't my door latch after installing new weatherstripping?

Door latch binding happens when the weatherstripping material is too thick for the frame gap, creating excessive compression force. To fix this, confirm your hinges are tight, adjust your strike plate position slightly, or select a hollow EPDM bulb profile with lower compression resistance.

Can I replace kerf weatherstripping in sub-freezing temperatures?

Yes, press-fit kerf weatherstripping does not rely on temperature-sensitive surface adhesives, allowing installation in cold weather. However, store the replacement material inside a heated room beforehand so the rubber remains flexible while being pressed into the 1/8″ channel slot.

What if my kerf channel slot is stretched out or damaged?

If a loose or worn kerf groove allows the barb stem to pull out, apply small dots of exterior silicone sealant inside the channel before pressing the seal into place. If the wood along the slot is split or rotted, replacing the stop moulding or executing a targeted frame repair is necessary.