(855) 676-0881

Storm Door Won’t Close All the Way: Closer, Sweep and Latch Fixes


Published: Oct 1, 2026

Few home maintenance issues are as frustrating as a storm door that halts just one to three inches before the frame. Every time you leave your house, you have to turn around, pull it shut manually, or listen to it bounce uselessly against the latch.

Many online DIY guides offer conflicting or outright incorrect mechanical advice that can damage your door or void its warranty. To help you fix this safely and efficiently, we have compiled a physically accurate, step-by-step diagnostic guide to get your storm door sealing perfectly.


The 15-Second Diagnostic Matrix

Before grabbing your toolset, use this quick troubleshooting matrix to match your door’s symptoms with its highly probable cause and diagnostic test.

Symptom Primary Suspect Quick Diagnostic Test
Closes fine when the main entry door is open, but bounces or stops short when the main door is closed. Air Lock (Vacuum Pressure) The Open-Door Test: See if the door closes on its own with the entry door swung wide open.
Door halts 1–2 inches short of the frame with a scraping sound or visible resistance. Bottom Sweep Drag The Paper-Slip Friction Test: Slide a piece of paper under the bottom sweep to test resistance.
Door hits the frame flush, but the handle latch fails to click into place. Latch / Strike Plate Misalignment The Lipstick Alignment Test: Mark the latch with lipstick or chalk to see where it contacts the strike plate.

Phase 1 - Defeating the "Vacuum Effect" (Air Lock)


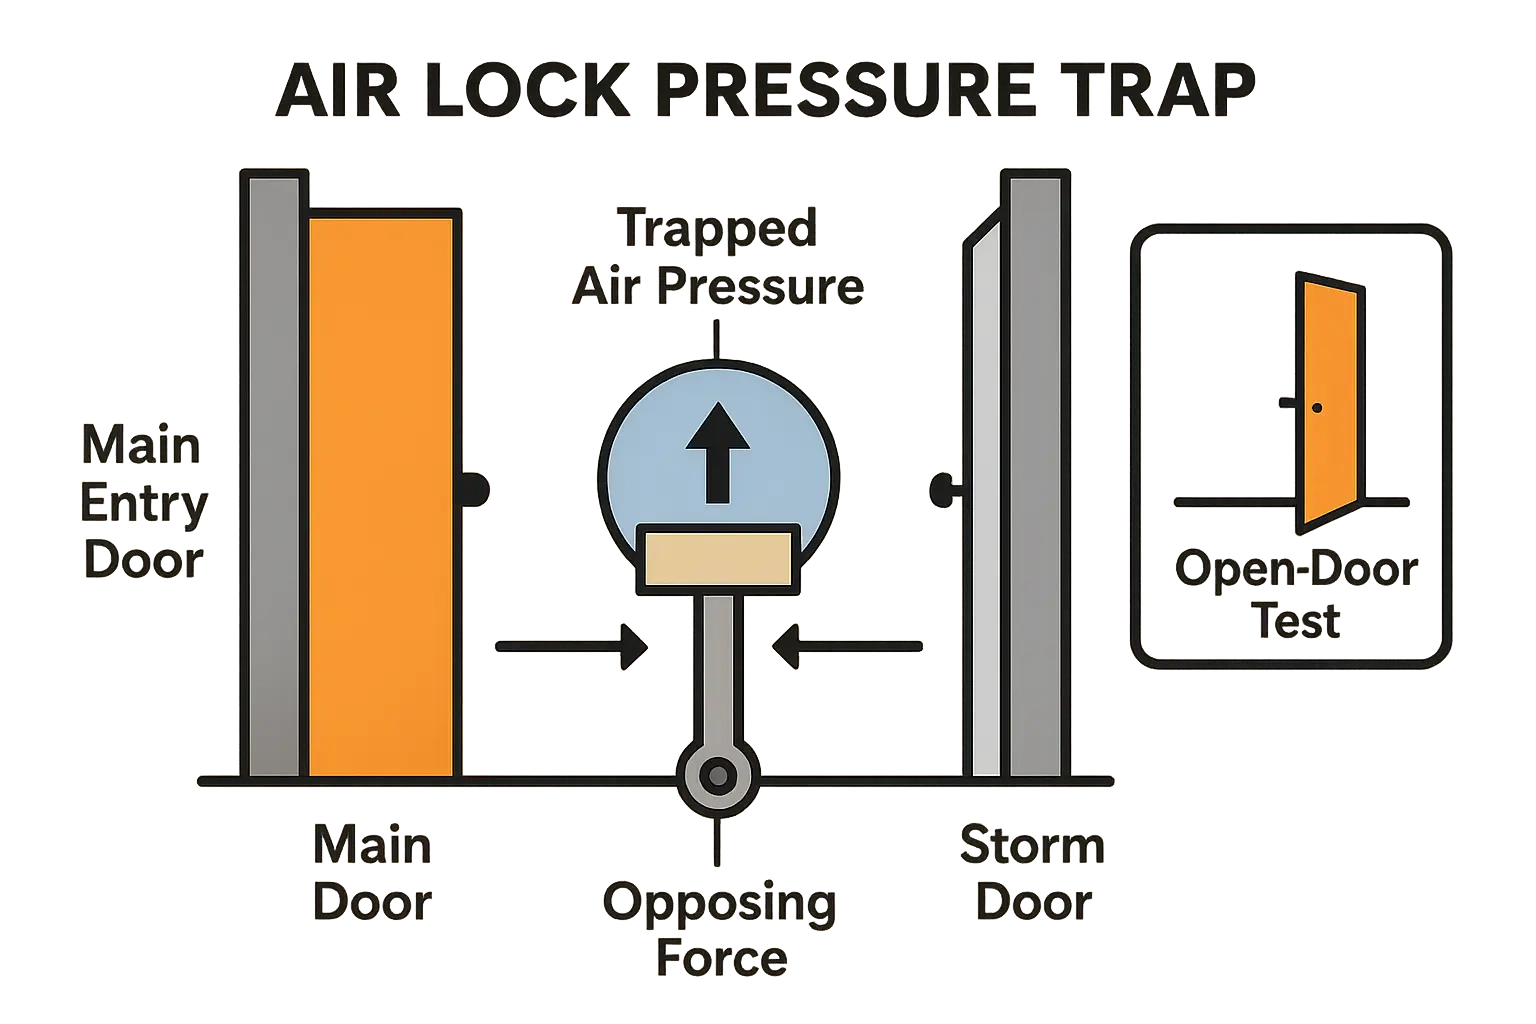
If your storm door shuts seamlessly when your main entry door is open, but bounces back when it is closed, you are experiencing an air lock pressure trap. When an entry door has high-performance weatherstripping, the space between the two doors acts like a sealed piston. Closing the storm door compresses this trapped pocket of air, exerting an opposing physical force that overrides the closing momentum.

To bypass this without drilling ugly, warranty-voiding holes in your door frame, you have two non-destructive solutions:

  • The Dual-Hole Closer Hack: Look closely at the metal bracket connecting your closer rod to the door jamb. Standard brackets feature two connecting pin holes. In the summer, keep the pin in the front hole (farthest from the door) to prevent slamming when using lightweight mesh screens. For winter, switch the pin to the rear hole (closest to the cylinder). This adjustments shifts the leverage angle, giving the closer the physical force required to push through heavy winter glass panels and compressed air.
  • Safe venting protocol: Lower your storm door’s upper glass panel by a mere 1/8 of an inch. This minor adjustment creates an invisible escape path for trapped air without letting the elements inside.

If your frame is warped or the door has sustained physical damage, you may require professional storm door repair to restore proper structural balance.

Visualizing the 'Air Lock Pressure Trap': When your main door is closed tightly, compressed air in the sealed space pushes back against your storm door, preventing it from closing correctly. The 'Open-Door Test' helps diagnose this issue by releasing this trapped pressure.


Phase 2 - Tuning the Door Closer (Speed & Tension)


When adjusting closing speed, keep the “Right-Tighty, Left-Lighty” rule in mind. Many contractor blogs mistakenly tell homeowners to turn the speed adjustment screw clockwise to speed up the door. This is physically backward.

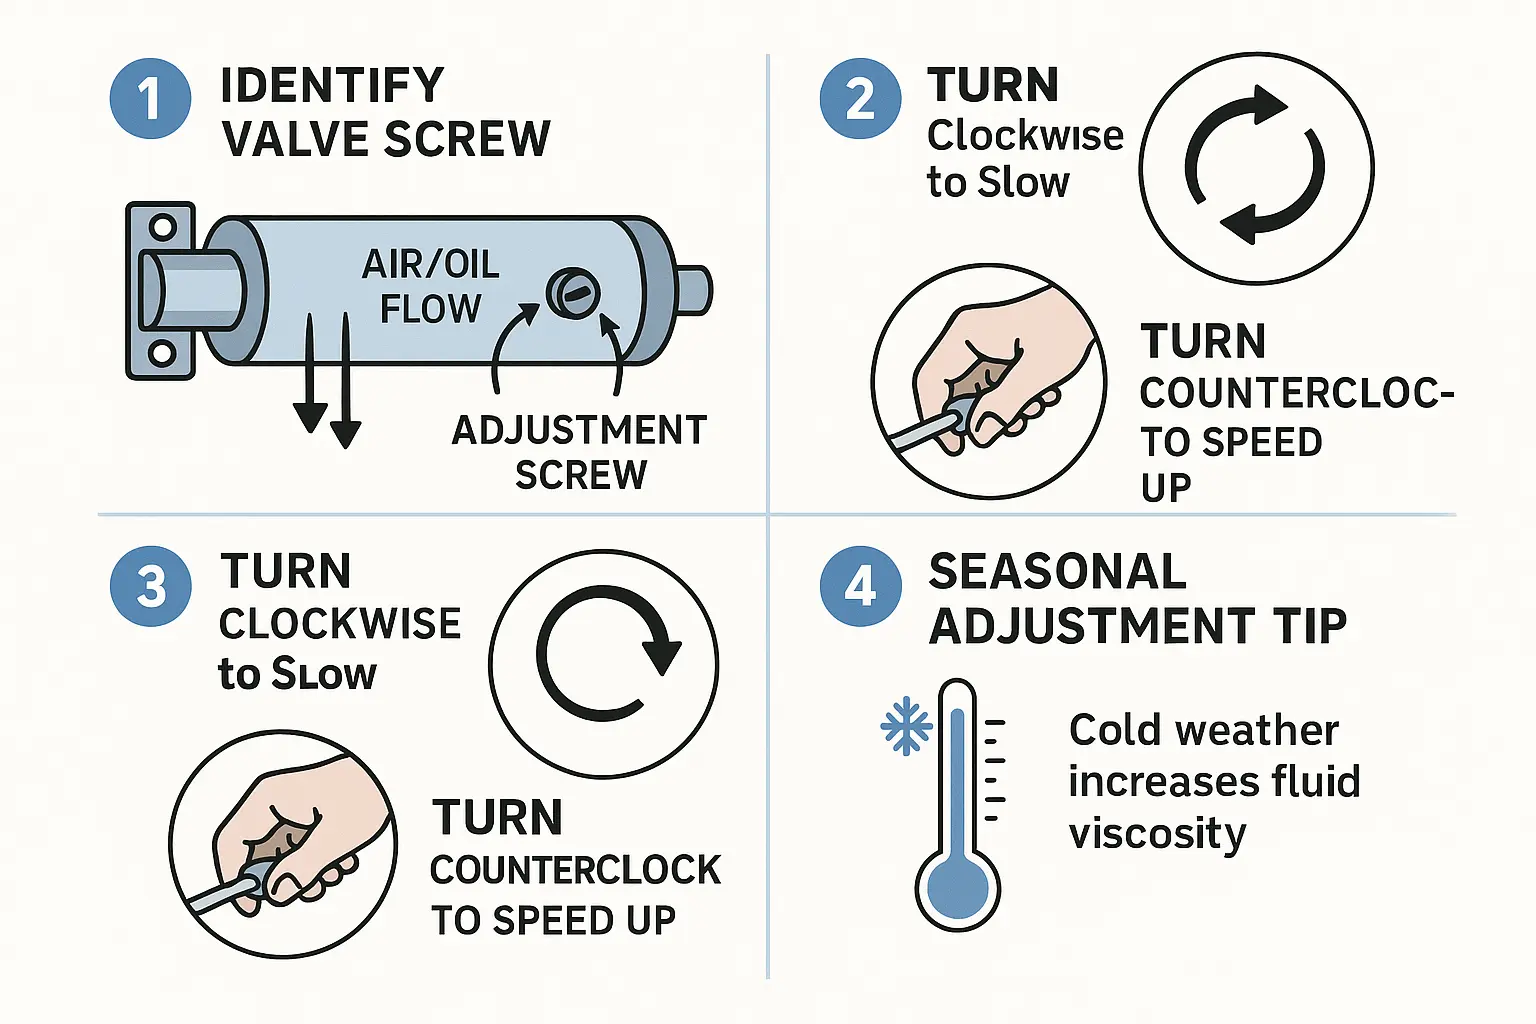
Turning the valve adjustment screw clockwise (Righty-Tighty) restricts internal air or hydraulic fluid flow, slowing the door down. Turning the screw counterclockwise (Lefty-Loosey) opens the valve, speeding the door up.

Understanding what type of closer you have is vital for seasonal maintenance:

  • Pneumatic Closers: These rely on air compression. Temperature swings alter air density inside the cylinder, requiring slight adjustment screws turns to maintain consistent performance.
  • Hydraulic Closers: These use fluid. Because oil viscosity increases drastically in cold weather, hydraulic closers naturally slow down in winter. Performing a tiny 1/8-turn counterclockwise adjustment in late autumn will compensate for thickening hydraulic fluid.

If your door stops because the metal hold-open clip is jammed on the piston rod, slide it free and apply a light coat of dry silicone spray. Do not use wet lubricants, which attract dirt and clog the inner valves. When standard adjustments fail to solve the issue, it may point to a blown internal seal that requires professional door closer services to replace.

How to tune your storm door closer valve: Turn clockwise to slow the door and counterclockwise to speed it up. Seasonal temperature changes require adjusting for thicker hydraulic fluid in winter to keep the door closing smoothly.


Phase 3 - Eliminating Bottom Sweep Friction


The adjustable rubber sweep at the bottom of your door is meant to block drafts, but if it is installed too low, it will scrape against the threshold and arrest the door’s closing momentum.

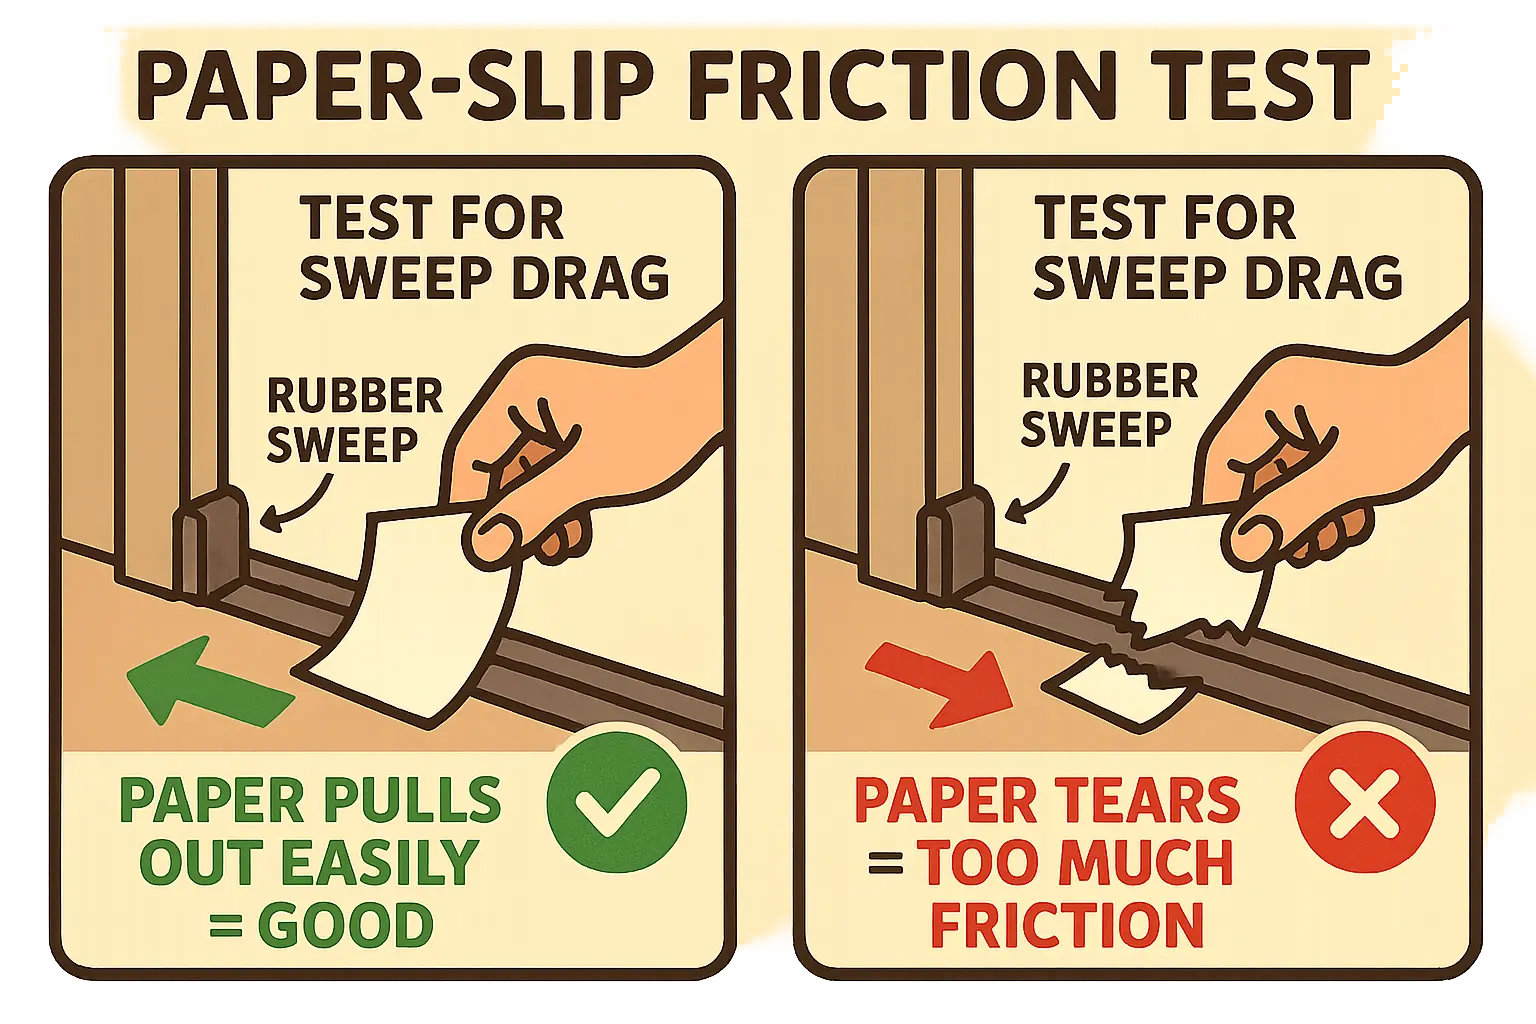
To determine if physical contact is holding your door back, perform the Paper-Slip Friction Test. Slide a standard sheet of paper beneath the rubber sweep. If you cannot pull the paper out without tearing it, your sweep is dragging too heavily against the threshold.

To correct this:

  1. Loosen the mounting screws located on the interior face of the sweep track.
  2. Gently nudge the sweep upward so that the rubber fins merely graze the threshold without bending or buckling.
  3. Retighten the screws in an alternating pattern to prevent the sweep from tilting during tightening.

If your entry threshold has suffered damage or wood rot over time, simple sweep adjustments won’t suffice. You can find more structural details by looking into your local door jamb repair cost to restore a flat, level surface.

Use the Paper-Slip Friction Test to check if your storm door's bottom sweep is dragging too hard on the threshold. If the paper tears when pulling out, the sweep needs adjustment for smoother closing.


Phase 4 - Realigning the Latch & Strike Plate


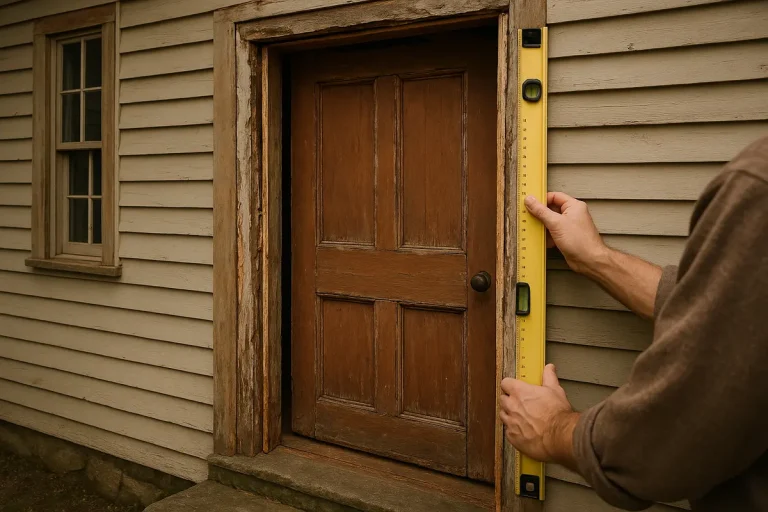
Seasonal wood expansion and contract cycles in your home’s exterior framing can shift your door out of alignment. If your storm door reaches the frame but fails to click into place, your latch bolt is likely striking the plate off-center.

To pinpoint the exact contact point, perform the Lipstick Alignment Test:

  1. Apply a light dab of bright lipstick or chalk directly to the face of the latch bolt.
  2. Slowly close the door until the latch makes contact with the strike plate.
  3. Open the door and look at the transfer mark left behind. This shows you exactly where the latch is catching.

If the latch is slightly too high or low, you can widen the strike plate opening by 1/16 of an inch using a metal hand file. If the alignment is significantly off, unscrew the strike plate, plug the old, stripped screw holes with wooden toothpicks and wood glue, drill fresh pilot holes, and reinstall the plate in its correct position.

Avoid using sticky penetrants like WD-40 on your latch, as they collect grit and cause internal components to fail. Instead, opt for dry graphite powder to keep mechanics working smoothly. For a deep dive into complex hardware problems, review the common tubular latch problems explained to ensure a permanent solution.


Frequently Asked Questions


Why does my storm door close perfectly when the entry door is open, but bounce back when it's closed?

This is caused by an air lock pressure trap. The space between your tightly sealed interior door and the storm door acts like a compressed air cylinder. When both doors are shut, the trapped air cannot escape quickly enough, creating backpressure that stops the storm door from latching. Lowering your glass storm panel by 1/8 of an inch or utilizing the rear hole on your closer bracket will solve this.

Can I just drill holes in the frame to relieve air pressure?

No. Some online videos recommend drilling relief holes directly into the storm door frame, but this is highly destructive. Drilling holes exposes raw aluminum or steel to moisture, leading to rust and corrosion, while instantly voiding your manufacturer’s warranty. Always opt for non-destructive adjustments like venting the glass panel.

How do I know if I need a new storm door instead of just adjusting the closer?

If your door frame is twisted, the metal structure is warped, or the glass track is sagged, adjustments to the closer or sweep will not fix the underlying problem. If your door remains stubborn after following this guide, consulting an expert exterior door guide or scheduling a professional inspection is the best way to determine if a complete replacement is required.