(855) 676-0881

Maximizing Front Door Energy Efficiency and Weatherproofing


Published: Sep 23, 2026

Evaluating your home’s energy efficiency often leads to checking the attic insulation or upgrading windows, but your front entry door is often the most significant thermal bridge in your home. According to the U.S. Department of Energy, air leaks around doors and windows account for 30% to 40% of a home’s total heating and cooling energy loss.

Understanding the science of heat transfer and physical draft mechanics can help you transform a drafty entrance into a highly efficient thermal barrier.

The Physics of a Drafty Door: Why Your Entryway is Freezing


seal drafty door

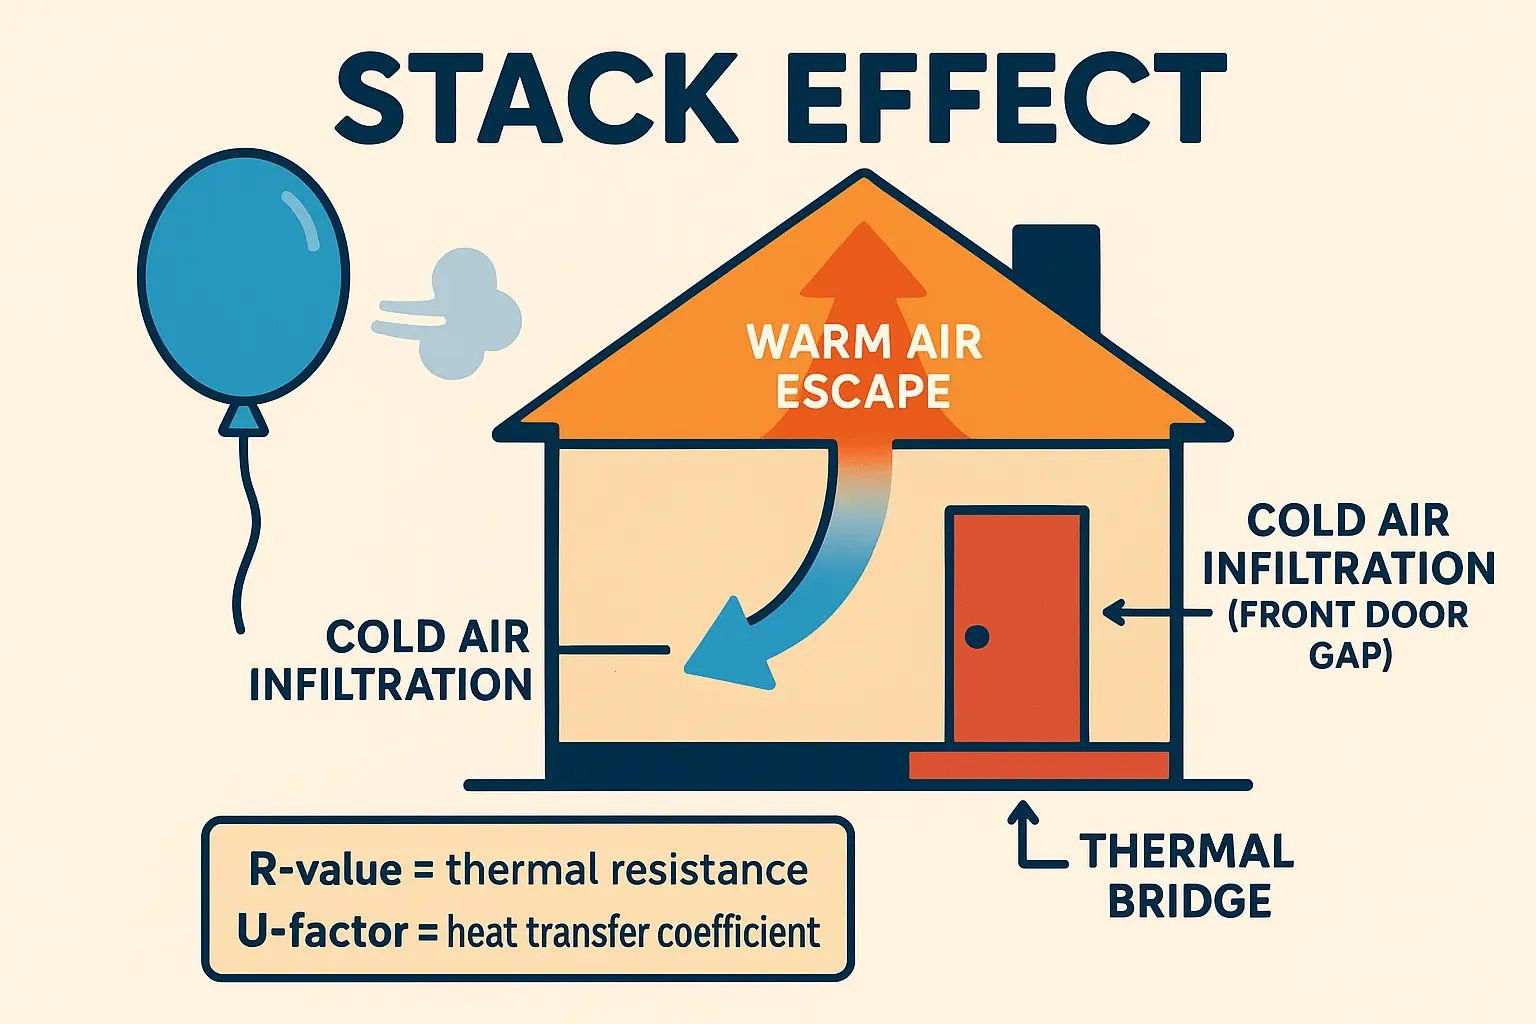
To understand why a cold draft aggressively pushes through your entry door, you must understand the “Stack Effect.” In cold climates, warm air inside your home rises and escapes through the attic. This upward movement creates a pressure differential—a vacuum at the lower levels of the house that pulls cold outdoor air inside through any available gap.

Convective heat loss through drafts is paired with conductive heat loss directly through the door’s core. When evaluating a door’s thermal performance, look at two key metrics: R-value (resistance to heat flow) and U-factor (rate of non-solar heat transfer). To maximize efficiency, you want a high R-value and a low door u factor.

Solid wood doors offer an insulation value of just R-2 to R-3 because wood conducts heat. Steel doors provide R-5 to R-6 but suffer from thermal bridging along their metal skins. Modern fiberglass doors are the thermal champions, reaching R-6 to R-10 due to polyurethane foam cores encased in non-conductive composite materials.

Interactive Diagnostic Checklist: Find Your Air Leaks


fix drafty door

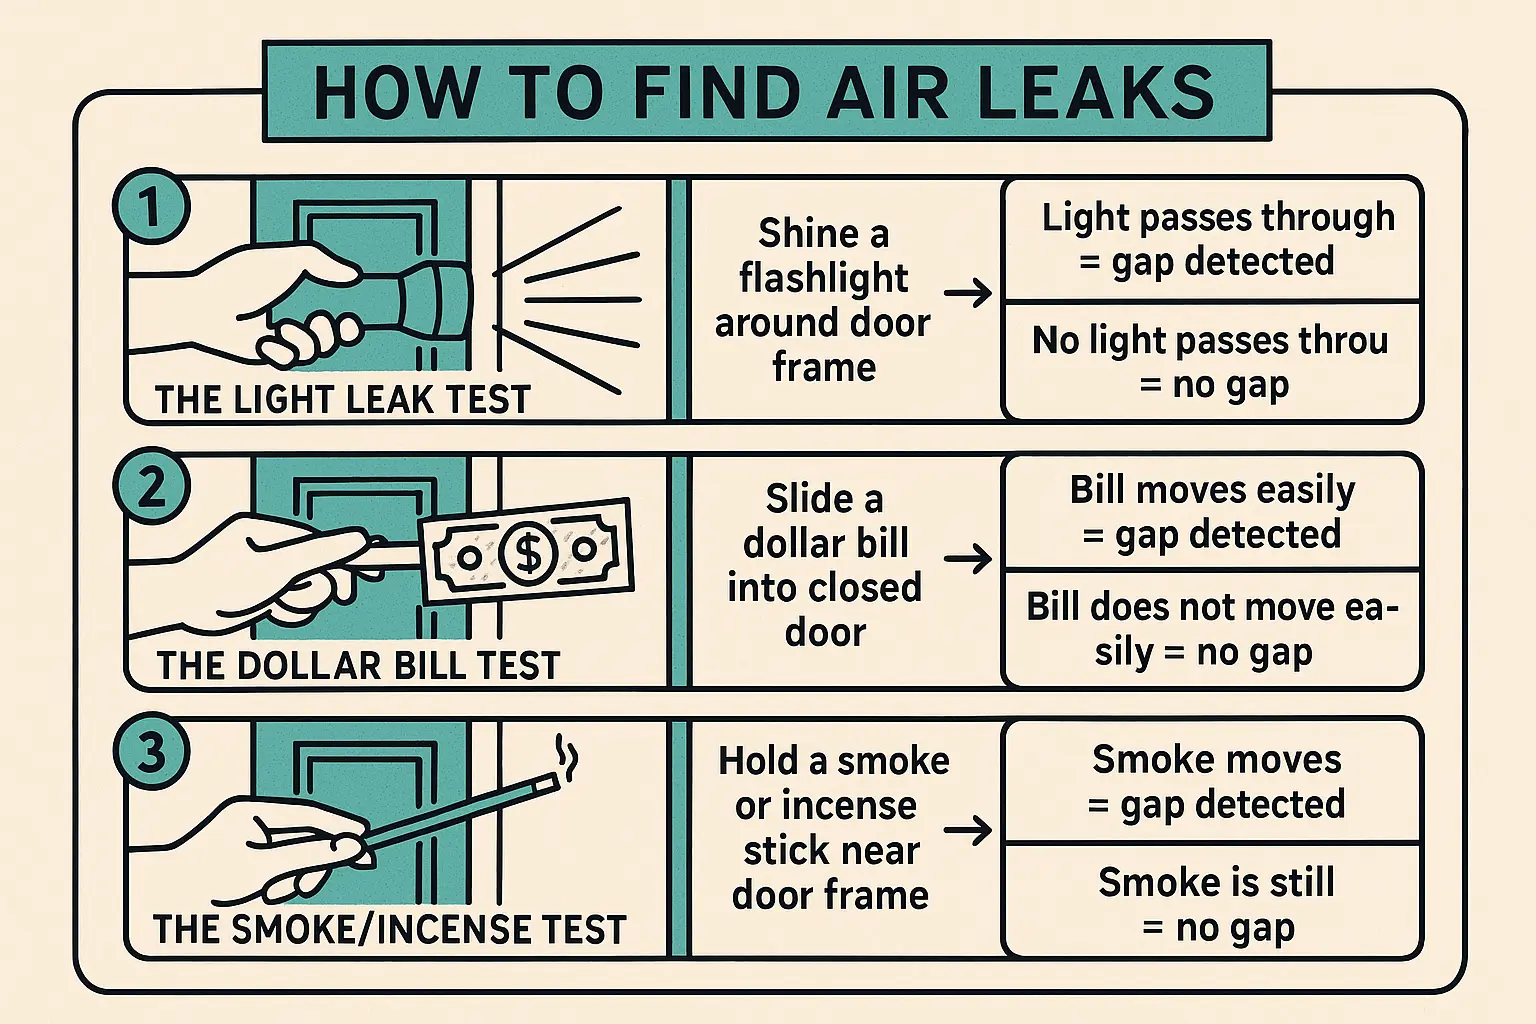
Before purchasing sealing materials, you need to identify where your door is losing energy. Use these three simple home diagnostic tests:

  1. The Light Leak Test: Stand inside on a bright day and inspect the perimeter. If you see daylight between the door and the frame, your seals have compressed or the door has warped.
  2. The Dollar Bill Test: Close your door on a dollar bill at various points around the top, sides, and bottom. Pull the bill out. If it slides out with zero resistance, your weatherstripping is failing to compress properly.
  3. The Smoke Test: Hold a lit incense stick or match near the door frame on a windy day. If the smoke blows horizontally, you have located an active convective air current.

The Ultimate Weatherstripping Material Showdown


drafty door fix

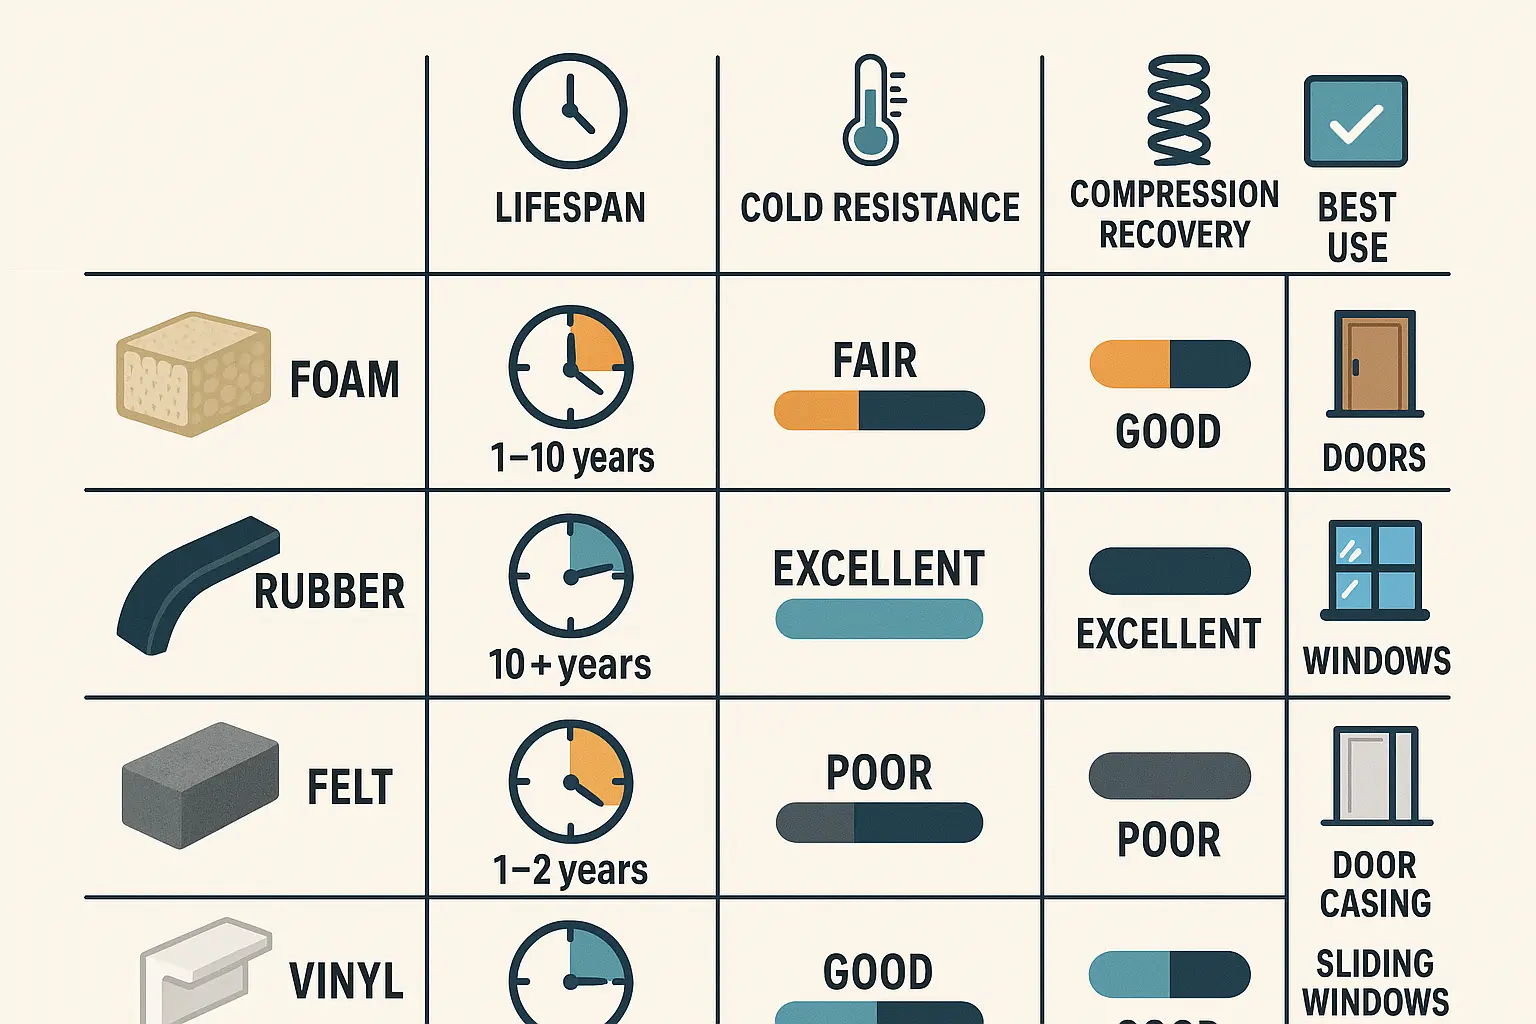
Choosing the right sealant is a balance of durability, cost, and compression recovery. Choosing a product that is too thick will prevent your door from latching, while a product that is too thin will fail to seal the draft.

Material Type Lifespan Cold Resistance Compression Recovery Best Used For
Felt 1 Year Poor Extremely Poor Budget-conscious renters
Open-Cell Foam 2 Years Moderate (Cracks) Poor Small, even interior gaps
EPDM Rubber 5-10 Years Excellent High Heavy-duty exterior doors
Silicone 10+ Years Outstanding Maximum (No Set) Harsh climates and uneven gaps

For doors with pre-cut grooves, professional kerf-in silicone profiles offer the most durable solution. For flat frames, high-quality, adhesive-backed EPDM or silicone tape is much easier to install.

Step-by-Step Draft Elimination Guide


Once you have identified the leaks and selected your materials, follow these steps to seal your entryway:

Phase 1: The Bottom Seal & Threshold Adjustment

The bottom of the door is highly susceptible to wear. Check the threshold first. Many modern doors feature adjustable thresholds with brass screws. Turn these screws counterclockwise to raise the threshold until it makes even contact with the door’s bottom sweep. If the sweep itself is torn, replace it with a slide-on, wrap-around, or screw-on aluminum door sweep.

Phase 2: Installing the Perimeter Seal

Remove your old weatherstripping and clean the door jamb thoroughly with rubbing alcohol to remove any residual adhesive or dirt. Measure the top and sides of the frame. Cut your chosen material to length using sharp utility shears. If you are using adhesive-backed tape, peel and press it firmly into the frame, ensuring it compresses when the door latches without binding the hinges.

Phase 3: The Foam Corner Wedge

Standard weatherstripping often leaves a tiny, invisible gap at the bottom corners where the jamb meets the threshold. Installing a self-adhesive foam corner wedge at the bottom corners of your frame will block these common leak points.

If you find that your frame is soft, rotting, or severely out of square, standard weatherstripping will not solve the issue. You may need a professional door jamb repair cost evaluation to restore structural integrity before adding new seals.

When to Weatherproof vs. When to Invest in Replacement


While DIY weatherproofing can temporarily stop minor drafts, it cannot cure structural failure. If your wood door has warped more than a quarter-inch, or if its core has rot, weatherstripping will not restore its energy efficiency.

Upgrading to an energy-efficient entry door is often the most cost-effective long-term choice. Modern fiberglass and insulated steel doors can dramatically lower your heating bills. Under the Energy Efficient Home Improvement Credit (Section 25C), homeowners can also claim a 30% tax credit (up to $500) for installing Energy Star-certified exterior doors.

For maximum protection against severe winter weather, pairing a new entry door with a professional storm door replacement adds an extra insulating layer of air, protecting your primary door from driving rain and snow.

If you are ready to stop drafts permanently, our team of licensed technicians is here to help. We can evaluate your entryway, repair damaged frames, or install a high-performance replacement front doors system tailored to your home.

Frequently Asked Questions


Will weatherproofing my front door prevent it from closing or latching properly?

If you select weatherstripping that is too thick, the door may require significant force to close, which strains the hinges and latch. Use the clay or play-dough test to measure your door gaps before purchasing materials to ensure you buy the correct thickness.

How do I know if my door frame is too damaged for weatherstripping?

If you notice visible rot along the bottom of the wood jamb, or if the door frame is warped out of square, adhesive or kerf-in seals will not adhere or compress evenly. In these cases, a professional frame and threshold repair is required to make the door airtight again.

Can I install a storm door instead of replacing my drafty front door?

While a storm door adds a valuable layer of defense against wind and water, it is not a complete fix for a failing primary entry door. If the main door lacks insulation or has large structural gaps, warm air will still leak past it, reducing the overall energy efficiency of your entryway.